 Reviews


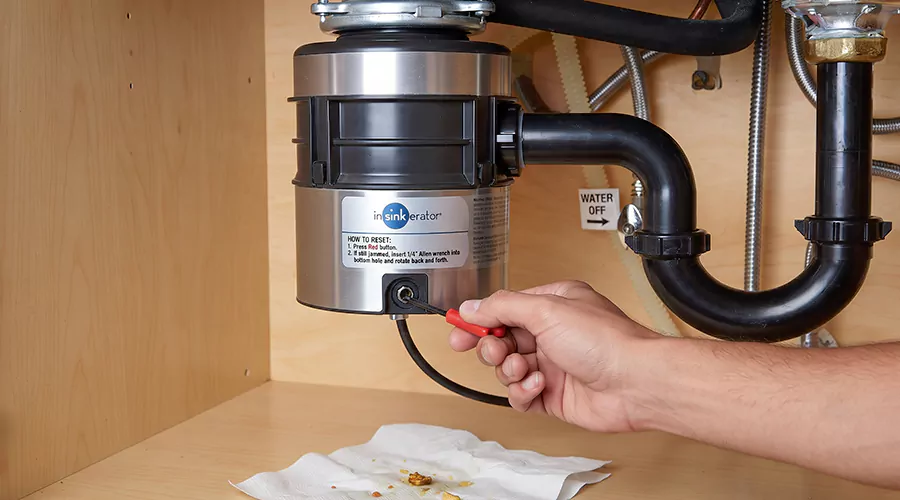
The most common Insinkerator fix is a ten-second button press that costs nothing. Professional service for the same problem runs $75 to $150 for a jam.
Insinkerator troubleshooting starts with sound. A silent unit has a power problem. A humming unit has a jam. Each symptom points to its own fix below.
The brand also ships its own repair tool with every unit. That little wrench solves half the problems in this guide by itself.
Know Your Insinkerator First
Three brand facts make every repair easier. The company includes a self-service wrenchette with new units for clearing jams from below. Keep it taped inside the sink cabinet.
- Model families matter for parts: The reset button sits dead center on the bottom plate across most models including the Badger 5 and the Evolution Compact and the Evolution Excel. The model number lives on a gray tag near the bottom of the housing.
- Warranty coverage surprises many owners: Insinkerator covers most models for 2 to 8 years depending on the series. Call their support line at 1-800-558-5700 before paying for any replacement on a younger unit.
Insider tip: photograph the gray serial tag today. The serial number establishes the manufacturing date that decides warranty claims.
Insinkerator Garbage Disposal Not Turning On
An Insinkerator garbage disposal not turning on with total silence has lost power somewhere between the panel and the motor. Silence actually rules out a jam. Work up the power chain in order.
- Press the reset: Resetting garbage disposal Insinkerator units takes ten seconds. Turn the wall control to off and press the red reset button on the disposer. A tripped button protrudes about a quarter inch instead of sitting flush.
- Respect the cooldown: An Insinkerator garbage disposal stopped working mid-grind almost always overheated. Let the unit cool for about 5 minutes before pressing the reset.
- Check the breaker and cord: Look for a tripped kitchen breaker at the panel. Then confirm the plug sits firm in the outlet under the sink.
- Wait out the delay: Some installs use a disconnect switch. A reactivated disconnect switch carries a 30-second delay before the unit will start.
- Test the switch: An Insinkerator garbage disposal not working after both resets has a wall switch fault or a wiring fault.
- Age writes the final line: An Insinkerator stopped working for good only when the motor dies. No reset revives a dead motor.
Insider tip: A reset button that pops back out instantly on a new unit points at wiring. A loose or reversed wire can trip the overload immediately.
Humming But Not Grinding
An Insinkerator not working humming has power reaching a motor that cannot spin. An Insinkerator jammed by a pit or a bone hums until the overload trips. The included wrench clears it from below in minutes.
Cut power first at the switch or the plug. Then work the steps:
- You can fix Insinkerator garbage disposal jams through the hex socket. Insert the wrenchette into the hole in the center of the disposal's bottom.
- Rotate the wrench clockwise and then counterclockwise several times until the resistance gives way with a release. Work it until it turns one full revolution.
- Remove any foreign object with a flashlight and tongs rather than your fingers.
- Let the machine cool for about five minutes and press the red reset button before use.
- Run cold water and test.
A unit that still refuses to run after the jam clears needs an authorized technician for diagnosis.
Insider tip: Free spinning with the wrench plus a hum means the jam already cleared. Persistent humming without spinning at that point usually means a seized motor bearing and that calls for replacement.
Insinkerator Leaking From Bottom
An Insinkerator leaking from the bottom seams is the one symptom with no repair path. Water at the base signals a failed internal seal that no reset can address. The seals are not serviceable on residential models, so if the leak appears soon after Insinkerator Installation, the unit may need to be replaced rather than repaired.
- Confirm the location before shopping: Dry the whole unit and run water while watching with a flashlight. Water travels downhill from loose top and side connections. Those two leak points cost $100 to $200 to reseal professionally or a few dollars in DIY parts.
- A true bottom leak also ends the electrical story: Water inside the motor housing makes the unit unsafe to revive. Budget for the swap instead.
Full Symptom Troubleshooting Table
Every Insinkerator not working case falls into one of five rows below. Full Insinkerator garbage disposal troubleshooting maps each symptom to a single first move. Start at your row and escalate only if the fix fails.
| Symptom | Most Likely Cause | First Fix |
|---|---|---|
| Total silence | Tripped overload or breaker | Red reset button |
| Humming only | Jammed flywheel | Wrenchette rotation |
| Trips repeatedly | Overheating or wiring fault | Cool down then inspect |
| Water at the base | Failed internal seal | Replace the unit |
| Drains slowly | Clogged discharge line | Clear the P-trap |
Most Insinkerator disposal troubleshooting ends at the first two rows. The reset and the wrench together resolve the vast majority of dead-unit calls without a single new part.
Repair or Replace in 2026
Age decides this question faster than any symptom. Disposals last about 10 years with proper care. A unit past 8 years or leaking from the bottom deserves replacement over repair.
- The numbers make the case: Professional Insinkerator disposal repair runs $75 to $250 on average in 2026. Meanwhile full replacement costs $200 to $550 installed with most homeowners paying $300 to $450. A $200 repair on a nine year old unit buys a year. The same money toward a new unit buys a decade.
- Warranty flips the math entirely: An Insinkerator repair under active coverage costs you a phone call. Check the serial tag before spending anything.
Insider tip: buy the replacement unit yourself during a home-store sale. Flat-rate installation averages $189 when purchased separately from the hardware.
When to Call a Professional?
Call a pro when electricity or repetition enters the story. Repairing Insinkerator garbage disposal wiring belongs with a licensed electrician or plumber. Three triggers settle it:
- The reset trips again after every cleared jam.
- The unit is hardwired rather than plugged into an outlet.
- A burning smell arrives with the hum.
Authorized service protects coverage too. Warranty terms can require an authorized technician for covered repairs. The support line dispatches them directly.
Prevention Keeps It Spinning
Insinkerator units die from their diet rather than their age. Four habits prevent nearly every jam and seal failure above. All four cost pennies.
- Run cold water through every grind: Start the water first and let it run 15 seconds after.
- Ban pits and bones and utensils: Those three build the jams the wrenchette exists for.
- Grind monthly ice: Ice cubes with a half cup of rock salt scour buildup from the grind chamber walls. Follow with cold water.
- Use it weekly: A disposal that sits unused develops flywheel corrosion that invites jams.
Conclusion
One red button and one small wrench solve most Insinkerator problems in under fifteen minutes. Silence means power and humming means jam. Bottom leaks and repeat trips mean the unit earned retirement. This week tape the wrenchette inside your cabinet and photograph the serial tag. The next breakdown will cost you minutes instead of a service call.